Serebyte
Home | Tutorials | Portfolio
In this tutorial we will look at drawing a triangle to our render buffer.
In this tutorial, we will look at drawing a triangle to our render buffer. The algorithm we will use will be quite tricky.
Our triangle function will require us to input three pairs of coordinates - one for each vertex. These should be integers. We will also need to input a red, green and blue value (each of these should be unsigned 8-bit integers).
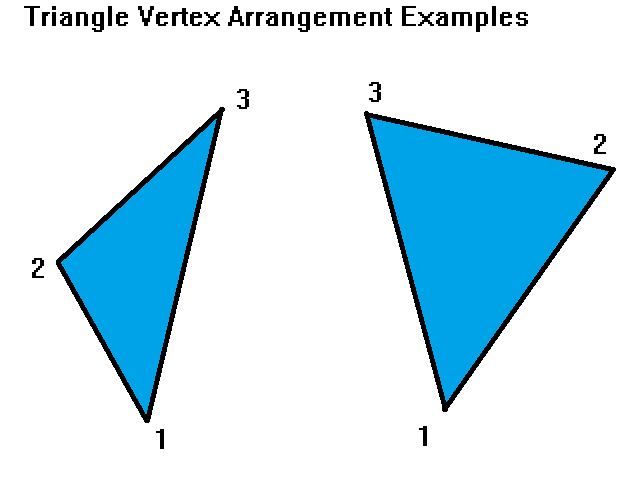
When drawing the triangle, we want our vertices ordered from smallest y-coordinate to largest, so that we always know which vertex is vertex 1, which is vertex 2, etc. We can use a sorting algorithm to sort our points (I will use insertion sort) in ascending order of y-coordinate.

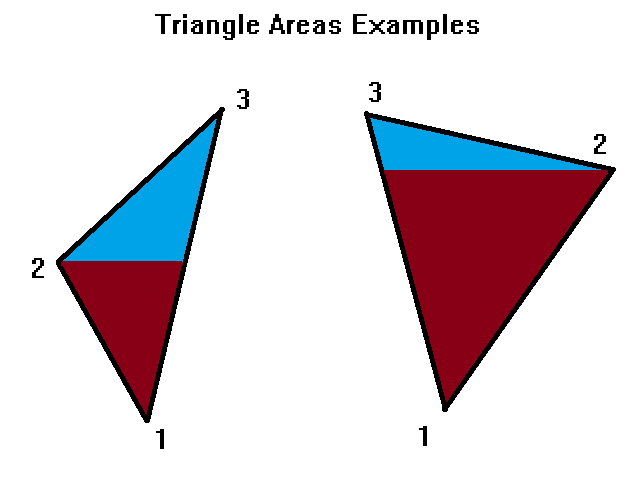
After ordering our vertices by y-coordinate, we can break each triangle into two sections. The first is the area between the y-coordinates of vertices 1 and 2, and the second is the area between the y-coordinates of vertices 2 and 3. These are also illustrated below:

Within each of these areas, we can split the area into a group of rows of pixels. The starting and ending x-coordinates of these rows of pixels is determined by the lines 1->2 and 1->3 for the first (red) area and 2->3 and 1->3 for the second (blue) area.
Before we can draw a triangle, we need to be able to draw a row. Our drawRow function needs to take two x coordinates (integers - named x1 and x2), as well as a set of red, green and blue values (where each colour is an unsigned 8-bit integer). The function doesn't need to return anything, so should be void.
Inside our function, we first need to create a pixel pointer. This will always point to the pixel we wish to draw to. We can create this with the line "Pixel * pixel;". Next we should calculate the minimum and maximum x coordinates of the row. I will create two variables to store these: "minX" and "maxX". If x1 < x2, minX should be set to x1 and maxX should be set to x2. Otherwise, we should set minX to x2 and maxX to x1. We can do this with the if statement "if(x1 < x2){...} else {...};". In side the first section of the if statement, we want to write "minX = x1;" and "maxX = x2;". In the else block, we want to write "minX = x2;" and "maxX = x1;".
Next, we should move our pixel pointer to the start of the row. We can do this with the line "pixel = renderBuffer.pixels + (BUFFER_WIDTH * y) + minX;". Next, we want to iterate through each pixel on the row. For each pixel, we should check if it is on screen and then draw it to the screen. We should create an integer loop counter with the line "int i;". We can start the loop with: "for(i = minX; i <= maxX; i++){". We can check each pixel is on screen wih the line "if(i >= 0 && i < BUFFER_WIDTH && y >= 0 && y < BUFFER_HEIGHT){". We can then draw the pixel by setting its colours with the lines: "pixel->red = red;", "pixel->green = green;" and "pixel->blue = blue;". Outside of the if statement, we can increment the pixel pointer to move onto the next pixel for the next iteration, using "pixel++;".
Our drawTriangle function should take, nine parameters. The first six are three pairs of integer x and y coordinates, name "x1", "y1", "x2", "y2", "x3" and "y3". The last three are unsigned 8-bit integers, and are the red, green and blue values.
We need to create an array of integers to store the x and y coordinates of our points. We can do this with the lines "int pointsX[3];" and "int pointsY[3];". We need to fill in our x and y points arrays. We can do this with the lines "pointsX[0] = x1;", "pointsX[1] = x2;" and "pointsX[2] = x3;" for the x, and "pointsY[0] = y1;", "pointsY[1] = y2;" and "pointsY[2] = y3;".
Now we need to sort our array of points. I will use an insertion sort for this. We can start by creating a loop counter with the line "int i = 0;". Then we should loop from the second point to the end with the line "for(i = 1; i < 3; i++){". Inside this loop, we should create another loop counter called j and set it to i with the line "int j = i;". Then we need to loop back through the list and swap the point at location i with any previous points with a y value greater than it. We also need to make sure that we do not try to access an invalid element of the array (e.g. pointsY[-1]). We can do this with the line "while(j > 0 && pointsY[j - 1] > pointsY[j]){". When the conditions in this loop are true, we need to swap our element at position j with the element before it, as the element before it has a greater y value. We can swap by creating a temporary variable to store the value at pointsY[j], using the line "int temp = pointsY[j];". We can then add the lines "pointsY[j] = pointsY[j - 1];" and "pointsY[j - 1] = temp;", in that order, to swap the variables in the location. We then need to do the same for the x coordinates of the points, using the lines "temp = pointsX[j];", "pointsX[j] = pointsX[j - 1];" and "pointsX[j - 1] = temp;". After swapping, we want to decrease the value of j by one, so that element j is at the new position of our current point for the next iteration of the while loop. We can do this with the line "j -= 1;".
Now that we have our points in ascending order of y-value, we can start drawing the first half (the set of y values between pointsY[0] and pointsY[1]) of our triangle. The x values that make up this area are bound by the lines connecting pointsX[0] to pointsX[1] and pointsX[0] to pointsX[2] (or points 1 to 2 and 1 to 3 in the diagrams above). Therefore, we need to create two variables to store our x coordinates. These should be floating point values, as we will be increasing them by a floating point value for each y value we increase by. They should both be set to the bottom-most vertex to start with. We can create these with the lines "float lineX1 = pointsX[0];" and "float lineX2 = pointsX[0];".
After this, we need to calculate the change in x per unit y for each line. Each time we go up by one row, we want to increase our lineX1 value by the change in x per unit y for the line connecting the first and second vertices. We also want to increase our lineX2 value by the change in x per unit y of the line connecting the first and third vertices. We can do this with the following two lines: "float xStep1 = (float) (pointsX[1] - pointsX[0]) / (pointsY[1] - pointsY[0]);" and "float xStep2 = (float) (pointsX[2] - pointsX[0]) / (pointsY[2] - pointsY[0]);".
Now we want to iterate through each row of pixels between the first vertex and the second vertex. We can do this with the loop "for(i = pointsY[0]; i < pointsY[1]; i++){". Inside the loop, we first want to draw a row between the current values of lineX1 and lineX2. Remember that our drawRow function automatically figures out which of the two x coordinates is larger so it doesn't matter which way around they go. We can draw a row of pixels with the line "drawRow((int) lineX1, (int) lineX2, i, red, green, blue);". After drawing our row, we want to increase our lineX1 and lineX2 coordinates by their corresponding x per unit y (xStep) values. We can do this with the lines "lineX1 += xStep1;" and "lineX2 += xStep2;". This will now draw all the rows of the triangle between the y-values of the first and second vertices.
To draw the rest of our triangle, we must draw the rows between the y-coordinates of the second and third vertices. This time, each row will be bound between the coordinates of the lines connecting the second and third vertices and the first and third vertices. We therefore need to change the value of xStep1 to the change in x per unit y of the line connecting the second and third vertices. This can be done with the line "xStep1 = (float) (pointsX[2] - pointsX[1]) / (pointsY[2] - pointsY[1]);". After this, we want to iterate through all rows of pixels between the second and third vertices using the line: "for(i = pointsY[1]; i < pointsY[2]; i++){". Inside this loop, we first want to draw our row again (using the line "drawRow((int) lineX1, (int) lineX2, i, red, green, blue);", as before). We then want to increase lineX1 and lineX2 again, with line lines "lineX1 += xStep1;" and "lineX2 += xStep2;", as we did before.
That concludes our drawTriangle function. Now we simply need to call said function in our render function. I will call it with the line "drawTriangle(100, 100, 200, 300, 500, 50 0, 0, 255);".
Below is the code for our render.c file for this project. You will of course need a main.c and a main.h file, which we have covered in previous tutorials. You will need to add declarations for the drawRow and drawTriangle functions to main.h, but nothing else needs to be changed (hence why the main.h file and main.c file are not shown below). You can compile the code using the command "gcc main.c -lgdi32 -o app" for the MinGW compiler. It should work in most other Windows compilers but the process of linking the gdi32 library may be different.
render.c
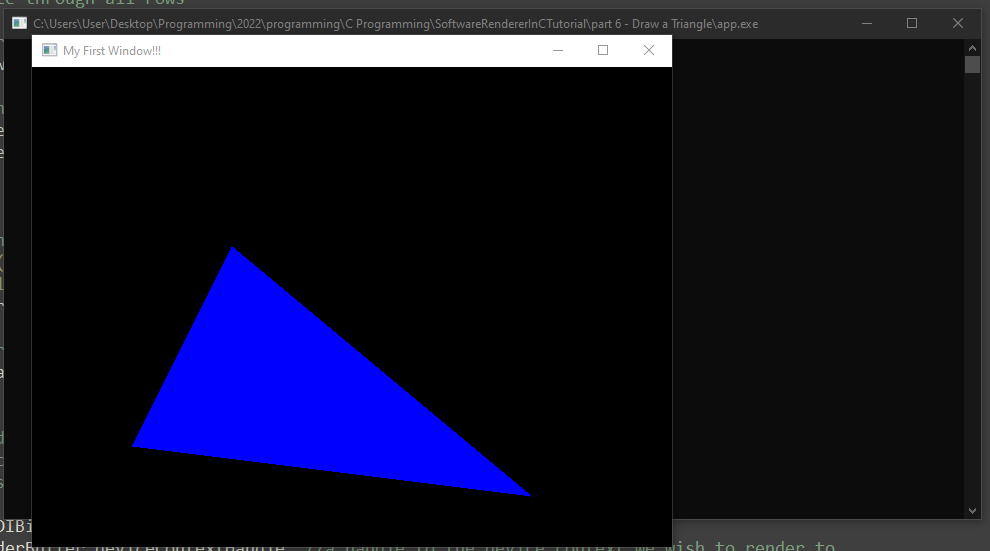
Running our program should give the following output:

That's all for this tutorial. In the next tutorial, we will look at drawing a circle.